
How to use Microsoft Excel to quantify ELISA data.
The Enzyme Linked Immunosorbent Assay (ELISA) was first described over 35 years ago by Engvall and Perlman. One of the big advantages of ELISA is that it can be used to accurately quantify protein levels. To do this you basically compare the levels of signal you obtain from a preparation with that you can get from a set of control standards. Analysis of this kind of data is often performed with specialized software, but can actually also be performed with current versions of Microsoft Excel and similar spreadsheet programs. This is how to do this; we are assuming you ran a standard 96 well ELISA plate, that you are running a typical antigen capture ELISA and that you ran a serial dilution of a protein standard in the top or A row of the plate, leaving the last well blank. The remaining 84 wells in the B, C, D, E, F, G and H rows contain experimental samples.
Run your ELISA being careful to wash extensively and apply your best possible pipetting technique. Below is some data from an actual experiment; the top row of the plate contained a serially diluted standard and the results below show the optical density of a set of 1:1 serially diluted samples of a protein standard, measured at an OD405, since we were using a phosphatase antibody conjugate and p-Nitrophenol chromagen. We typically use a whole row of the ELISA plate, and it is important to leave the last well blank, which will indicate the non specific background. The data below this is the calculated amount of the standard protein in each of the standard wells.
OD405 |
1.34 |
1.23 |
0.871 |
0.554 |
0.322 |
0.205 |
0.142 |
0.109 |
0.095 |
0.091 |
0.085 |
0.082 |
ng/ml |
12.5 |
6.25 |
3.125 |
1.563 |
0.781 |
0.391 |
0.195 |
0.098 |
0.049 |
0.024 |
0.012 |
0.000 |
On plotting out this data looks like this; to do this is Excel select the Graphwizard icon, choose the "XY(scatter)" plot, and choose the plotting option which displays the data points and joins them with lines.
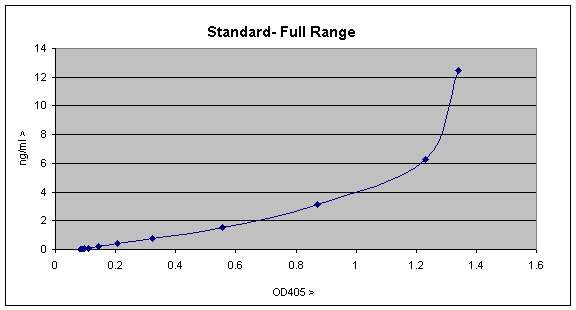
The graph is a fairly typical one showing a linear range up to ~0.3 OD units or ~1ng/ml, with a curve of increasing gradient after that. The curve forms as a result of the assay becoming more and more saturated and will eventually become a vertical straight line, since the assay is completely saturated. The linear part of this standard curve is the most sensitive part of the curve and is the most easily used for quantitation, so you can replot as follows;
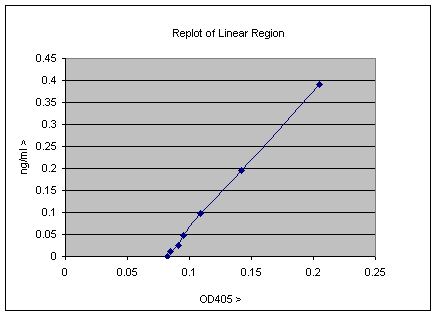
This is typical real data, and the plot above contains some useful information. The point at which the line intercepts the X-axis gives the background of the assay, and this value can be subtracted from all the experimental data; clearly it is about 0.08 OD405 units. This factor and gradient of the line gives the relationship of the OD405 units to ng/ml values. This can be calculated by measurement or by using more sophisticated software, but it turns out that Excel can do this for you also. Simply select the line, and on a PC right click and select the “add Trendline” option. The select from the trend/regression type menu the first option which is the linear regression. There is also an options menu from which you can select check boxes to “Display equation on chart” and “Display R2 value on Chart”. When you have done all this the plot will look as below;
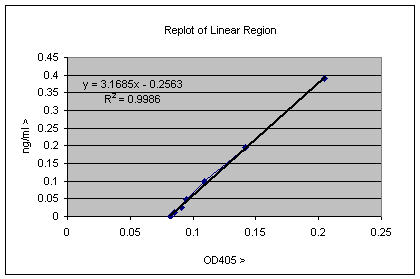
The equation Y = 3.1685X– 0.2563 allows you to translate OD405 values directly to ng/ml concentrations. The R2 value tells how close to the trendline the data actually is, and a value of 0.9986 is pretty good (a value of 1 would be perfect). You can try different regions of the linear end of the graph looking for the R2 value closest to 1. So to translate the OD405 value in cell B1 of the ELISA well into ng/ml values, you can simple put the equation “=((B1*3.1685)-0.02563)”. By which we mean insert into an appropriate cell in the spreadsheet everything between the inverted commas. If you copy this equation into the next 11 cells to the right Excel will automatically change the B1 to B2 etc. along the series. If you copy this entire row and paste into the 6 rows below, Excel will change B1 to C1 etc, so you can calculate values appropriate for the rest of the 96 well dataset. The data in each well is therefore transformed from OD405 to ng/ml. Of course these values are ng/ml in the ELISA well, so if these samples were diluted by some factor, you need to multiply by that factor to get the true value. The equation can also be used to determine the background of the assay, which is the value of X when Y = 0, in this case 0 = 3.1685X – 0.2563, so X = 0.2563/3.1685 = 0.0809, though you could already see that by looking at the plot. It is also possible to use Excel to insert a trendline in the non-linear part of the standard curve. This would be useful for quantitation of samples giving stronger signals, so that the OD values obtained correspond to this non-linear part of the standard curve. In this case insert a trendline and select the "Polynomial" option, which will give an equation of the form Y = AX2 +BX + C; this can then be pasted in the other cells of the spreadsheet as was done for the simpler linear equation.